Heusinkveld Calibration Tool (Beta & Unsupported)

All instructions and software listed on this page are related to the Beta version of the Heusinkveld Calibration Tool. This is legacy software which is likely to contain a few bugs and usability issues.
We do not provide support on this software and we do no longer provide a download link. If you have any issue at all using an already installed version of this software, please revert to the calibration method outlined in the product manual which involves using DiView.
Please note that this tool only works for version V3 of our controller board (which has a blue or green PCB). The V1 and V2 version of our controller (black PCB) are not supported (it may work, but this is uncertain).
If you want to use a 100% proven method to calibrate your pedals, please refer to the Product Manual of your Sim Pedals set which is listed on the Support page. Those product manuals contain instructions on how to calibrate using DiView, which has been the recommended and reliable calibration solution for the past few years.
During development we’ve released a number of versions of this tool in quick succession. Some of the instructions below may concern an older version of the tool.
Download link
We do not provide support on this software and we do no longer provide a download link. If you have any issue at all using an already installed version of this software, please revert to the calibration method outlined in the product manual which involves using DiView.
Latest version was Version 0,2L (March 15th 2018)
Instructions
Follow the instructions below in order to calibrate your pedals. Also see the images below the instructions for further reference.
- Download the ZIP-file, unzip and install the software in a directory of your choice.
- Make sure the pedal controller is connected to the PC with a USB cable. Connect the pedals to the RJ-ports of the controller.
- Launch the software.
- Select your pedal set (Pro or Ultimate).
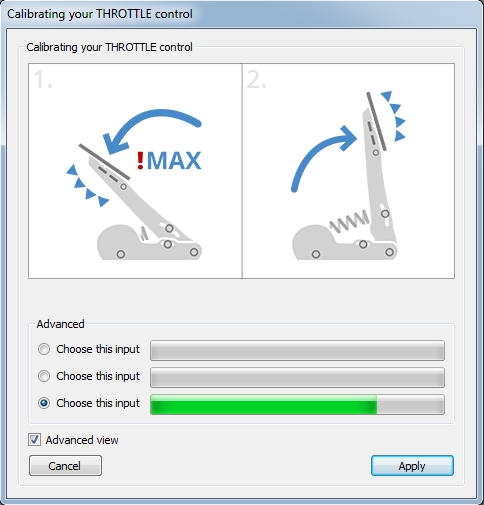
- Calibration is done per pedal (axis). When you click on the ‘Calibrate’ button below a pedal, a new window will appear asking you to press and release the pedal. After doing this, press ‘Apply’. A green status bar should now be moving in the main screen of the tool.
- In case the pedal is not properly detected, press ‘Calibrate’ again and then tick ‘Advanced view’ in order to select the correct axis input.
- Our pedals sensors are sensitive to the touch of a finger. In order to eliminate small signal jitter when the pedal is not pressed, you can set a deadzone (% or kg) on the lower end of the pedal range.
- When the throttle and clutch are fully pressed, the pedal arm will hit a soft end stop. You may want to set a small deadzone (%) at the top end of the pedal travel to make sure you get 100% pedal output without having to press hard into the soft end stop.
- After calibrating all 3 (or 2) pedals, press ‘Apply Settings’ at the bottom right in the main screen of the tool. The calibration settings are now stored and you are ready to race.

Instructions - further details on the brake pedal calibration

The Calibration Tool makes it easy to select a specific brake pedal force at which you get 100% output in your simulation software using a simple slider. If you adjust the ‘Max Force’ slider to 50kg and press ‘Apply Settings’, you will get 100% pedal output when you press 50kg of force at the pedal.
If you then for example adjust the slider to 30kg and press ‘Apply Settings’, you will see that it becomes easier to max out the green status bar of the brake to 100% when pressing the pedal. Your simulation software will normally max out the brake pedal output at the same values as set in the calibration tool.
Please note that due to small deviations in electronic components this force setting has an accuracy of +- 10%. Also, because when the brake pedal is not pressed there is always a bit of preload on the brake sensor, the Min Force slider will always have a value above 0kg.
Instructions - Advanced mode
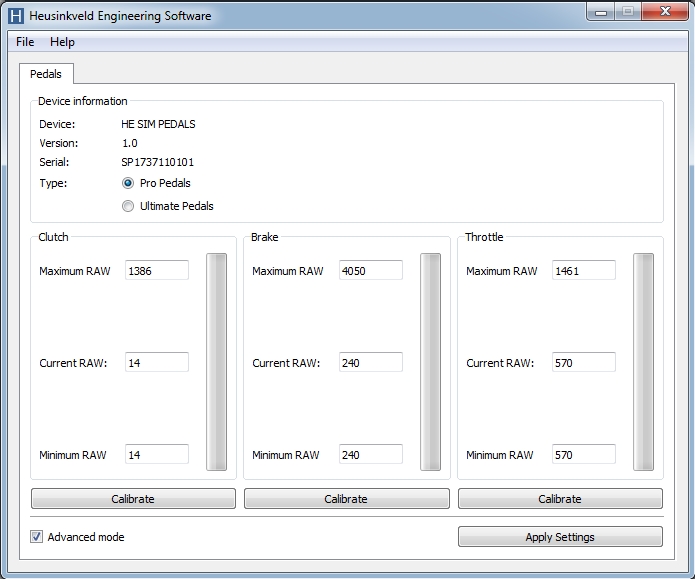
In case you want to manually set the RAW sensor values which determine the lower and upper range of your calibration, you can select ‘Advanced Mode’ at the bottom left in the main screen of the tool. This will allow you to set the Minimum RAW and Maximum RAW values per axis. After setting these values, click ‘Apply Settings’.
Your pedal will go from 0% to 100% output when the pedal sensor is between the specified Minimum and Maximum RAW value. Increasing the minimum RAW value or decreasing the Maximum RAW value allows you to set a deadzone. You can check the green status bar in order to monitor the calibrated pedal output.
Instructions - iRacing
The tool also contains experimental functionality to calibrate your iRacing pedal calibration from within our calibration tool. In order to use this functionality, make sure to first assign the pedals to a function within iRacing itself. After this, you can use our calibration tool.